![]()

Understanding OpenArt’s Ultimate Upscale
What is Ultimate Upscale?
OpenArt’s Ultimate Upscale is a premium feature designed to elevate the quality of your generated images. It goes beyond simple resizing, aiming to add detail and clarity to achieve professional-looking results.

This is achieved through different modes, allowing users to tailor the upscaling process to their specific needs. It can take an image to stunning 2K or 4K resolution while adding more clarity and details.
This tool is invaluable for content creators, artists, and anyone seeking to leverage AI for visual content. It allows you to produce visuals ready for print, high-definition displays, or any application demanding superior image quality.
Key Benefits of Using Ultimate Upscale:
- Higher Resolution: Transform low-resolution images into crisp, detailed visuals.
- Enhanced Clarity: Sharpen blurry areas and reveal intricate details.
- Customizable Upscaling: Fine-tune the process with different modes and settings.
- Professional Quality: Produce images suitable for commercial and high-end applications.
Ultimately, Ultimate Upscale empowers you to get the most out of your AI image generations, making them more impactful and visually appealing.
The Different Upscale Modes: Precise, Refined, and Creative
The Ultimate Upscale tool offers different modes to customize the upscaling process, suiting various image types and artistic visions.
- Precise Upscale:

This mode focuses on preserving the original image’s details as accurately as possible. It’s ideal for images where fidelity is paramount, such as portraits where you want to retain the subject’s unique features.
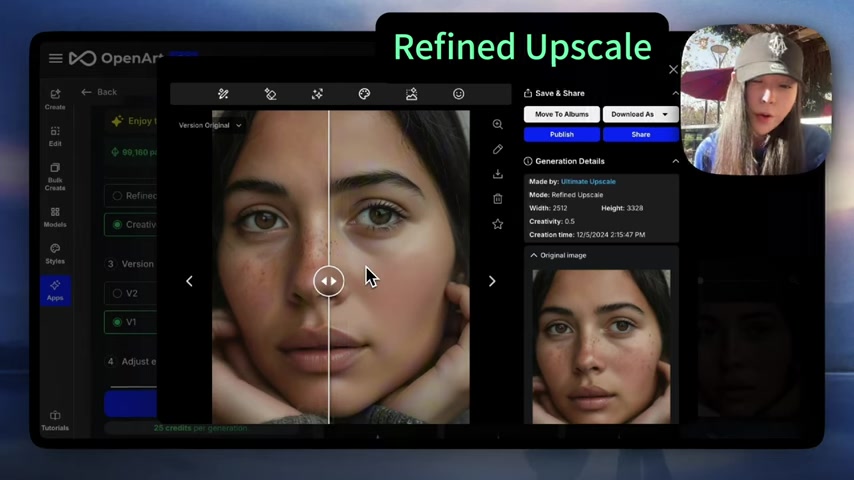
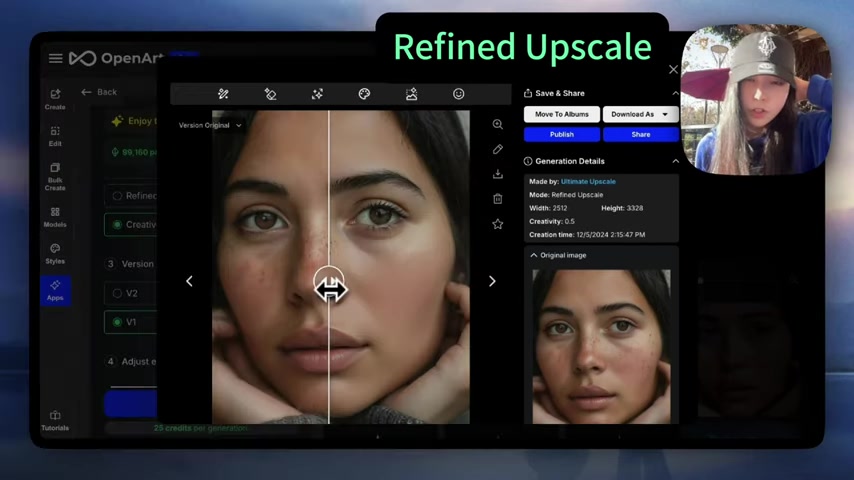
- Refined Upscale: This new addition sits between Precise and Creative, offering a balanced approach. It enhances clarity and detail while also smoothing out imperfections, such as skin blemishes, without drastically altering the original image. This mode generally changes things more, and smooths out the skin a lot.
- Creative Upscale: This is where you can inject more artistry into the process. Creative Upscale comes in two versions (V1 and V2), offering different artistic interpretations. It can drastically alter the image, adding unique effects and textures. Keep in mind that different versions of creative upscale can change the original face, so it is perfect for fictional characters you are creating where the face is not as important. It likes to add wrinkles, so that it why it created V2. But V1 is still great for some creative artistic use case.
Choosing the right mode is key to achieving your desired results. Experiment with each to discover which best suits your image and artistic goals.
Step-by-Step Guide: Using OpenArt’s Ultimate Upscale
Uploading Your Image
- Navigate to the Upscale Feature: Once logged into OpenArt, find the ‘Apps’ section in the left-hand menu.
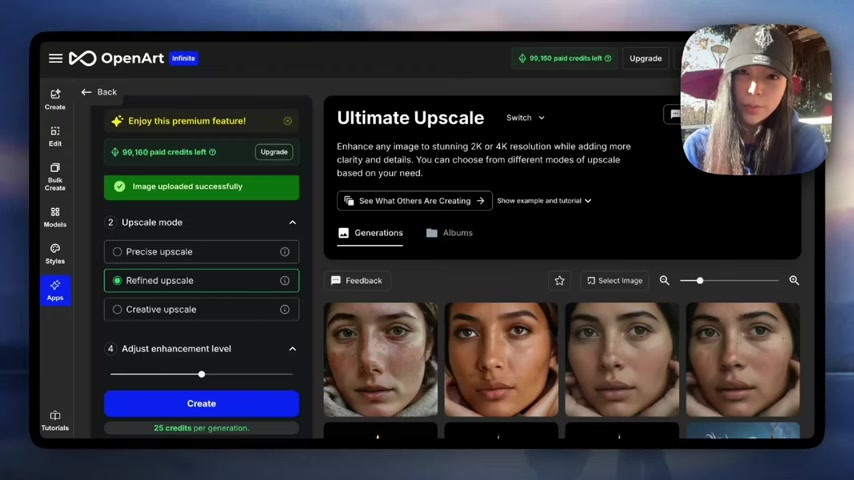
From there, select ‘Ultimate Upscale’.
- Upload Your Image: Click on the ‘Upload your image’ area. You can either drag and drop your file or browse your computer to select it. The platform supports common image formats such as JPEG, PNG, and others.
- Verify Successful Upload: Once uploaded, you should see a green ‘Image uploaded successfully’ message.
Selecting the Upscale Mode and Enhancement Level
- Choose Your Upscale Mode: Expand the ‘Upscale mode’ section and select the mode that best suits your needs: ‘Precise upscale’, ‘Refined upscale’, or ‘Creative upscale’.
- Adjust Enhancement Level (for Refined Upscale): If you selected ‘Refined upscale,’ you can fine-tune the enhancement level using the slider in the ‘Adjust enhancement level’ section. Move it towards ‘Subtle’ for minimal changes or towards ‘Creative’ for more dramatic enhancements.
- Creative Upscale Version Selection: Select V1 or V2.
Initiating the Upscale Process
- Click ‘Create’: Once you’ve selected your desired mode and enhancement level, click the ‘Create’ button.
- Wait for Generation: The platform will now process your image. The generation time will vary depending on the image size and the selected upscale mode.
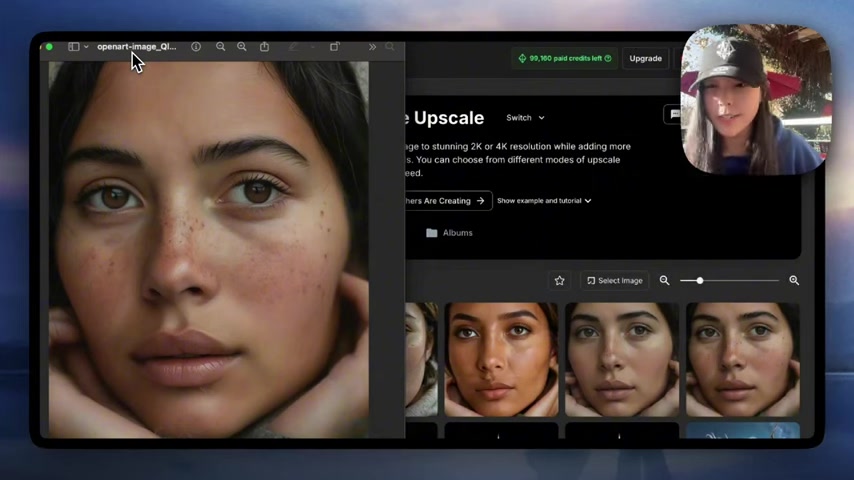
- Review and Download: Once complete, the upscaled images will appear. Review the results and select the image you want to download.
- Download Image: Click on the download icon to save the image to your computer.
Unlocking Potential: Use Cases for Ultimate Upscale
Enhancing Human Portraits
Ultimate Upscale can transform low-resolution portraits into stunning visuals with enhanced detail and clarity. Use the Precise mode to retain original features or the Refined mode to smooth skin and enhance features. In the creative upscale use V2 as it performs better with human faces.
Improving Blurry Images
Have old photos that are blurry or out of focus? Ultimate Upscale can help. Use the Refined Upscale mode and adjustment level can help improve the image and enhance the resolution.
Elevating Artistic Creations
Bring your AI-generated artwork to life with Ultimate Upscale. Experiment with the Creative modes to add unique textures and effects or the Precise and Refined modes to enhance detail and clarity.
This would be perfect for the artistic images that really shine!
Fixing Hands
This AI is based on flux which can help fix hands in the image.
![]()
